

Are you struggling to make the most out of QuickBooks? Do you want to streamline your accounting processes and maximize the benefits of this powerful software? Look no further! In this comprehensive guide, we will provide you with valuable tips and strategies to use QuickBooks effectively. Whether you are a small business owner, an accountant, or a financial professional, these tips will help you navigate through the complexities of QuickBooks and optimize its features for your specific needs.
Contents
- 1 Introduction
- 2 Getting Started with QuickBooks
- 2.1 Setting Up Your Company File
- 2.2 Navigating the QuickBooks Dashboard
- 2.3 Customizing Your Chart of Accounts
- 2.4 Setting Up Automatic Bank Feeds
- 2.5 Creating and Sending Professional Invoices
- 2.6 Utilizing Keyboard Shortcuts
- 2.7 Managing Payroll and Employee Data
- 2.8 Maximizing Reporting and Analytics
- 2.9 Analyzing Key Performance Indicators (KPIs)
- 2.10 Utilizing Help Resources
- 2.11 Backing Up Your Company File
- 3 Frequently Asked Questions (FAQs)
Introduction
QuickBooks is a popular accounting software developed by Intuit. It offers a wide range of features and functionalities that can simplify your financial management tasks. From invoicing and payroll to inventory tracking and financial reporting, QuickBooks provides a comprehensive solution for businesses of all sizes.
While QuickBooks is user-friendly, mastering its full potential requires some expertise. By following the tips and best practices outlined in this article, you can enhance your efficiency and accuracy when using QuickBooks. So, let’s dive in and discover how you can make the most out of this powerful accounting tool!
Getting Started with QuickBooks
Before we delve into the specific tips and tricks, let’s start by exploring the essentials of setting up and navigating QuickBooks.
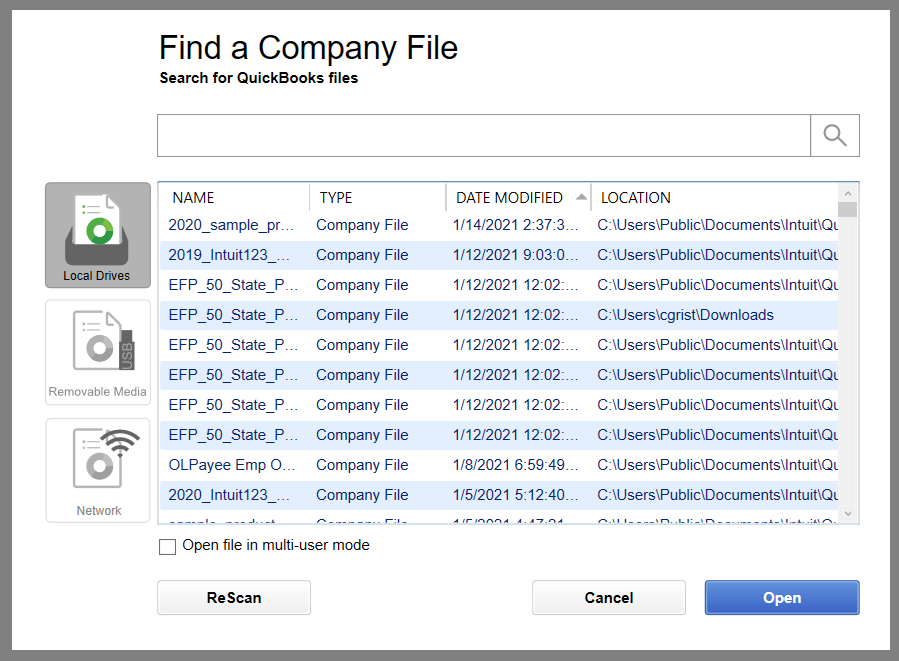
Setting Up Your Company File
To begin using QuickBooks, you need to set up your company file. This file will store all your financial data, such as accounts, transactions, and reports. Follow these steps to set up your company file:

- Open QuickBooks and select “Create a new company” or “Start a new company.”
- Enter your company’s name, address, and other relevant information.
- Select your industry type and business structure.
- Set your fiscal year start date and tax form.
- Choose a location to save your company file.
Once you have set up your company file, you will be greeted with the QuickBooks dashboard. Familiarize yourself with the various sections and features of the dashboard, such as:
Home: Provides an overview of your company’s financial health and displays important tasks and reminders.

Customers: Manages customer-related activities, including invoicing, estimates, and sales receipts.
Vendors: Handles vendor-related transactions, such as bills, purchase orders, and expense tracking.
Banking: Enables you to connect your bank accounts, reconcile transactions, and import bank statements.
Reports: Generates various financial reports to analyze your business’s performance.
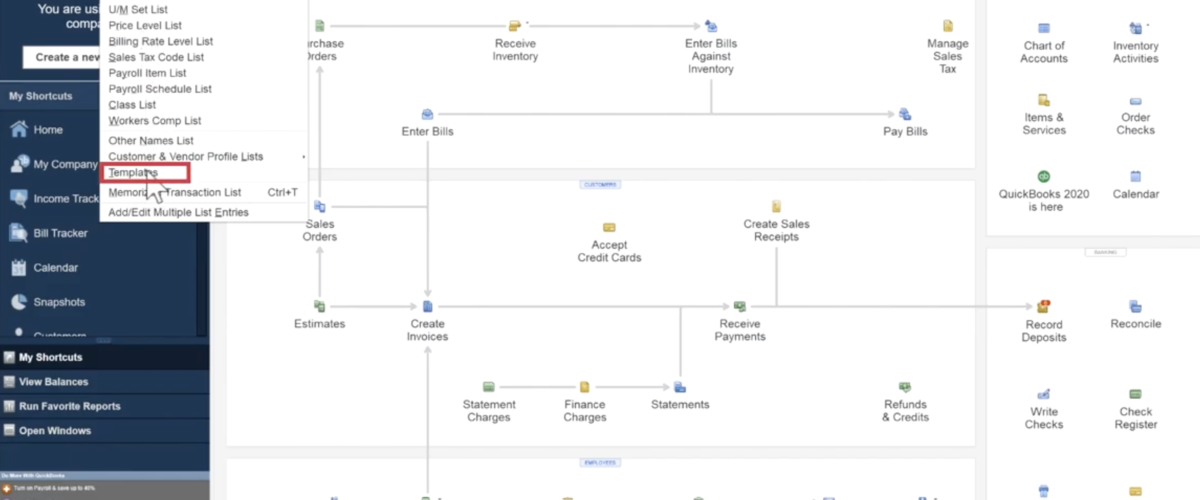
Customizing Your Chart of Accounts
The chart of accounts is a fundamental component of QuickBooks that categorizes your financial transactions. Customizing your chart of accounts allows you to tailor it to your specific business needs. To customize your chart of accounts:
[media-credit id=”1″ align=”alignnone” width=”535″] [/media-credit]
- Click on “Lists” in the top menu and select “Chart of Accounts.”
- Review the existing accounts and delete or modify any irrelevant ones.
- Click on “Account” and choose “New” to add new accounts.
- Assign appropriate account types and subaccounts for accurate categorization.
- Entering and Managing Transactions
Now that you are familiar with the basics, let’s explore some tips for entering and managing transactions effectively in QuickBooks.
Setting Up Automatic Bank Feeds
Linking your bank accounts to QuickBooks through automatic bank feeds can save you time and reduce manual data entry errors. With bank feeds, your transactions are automatically imported into QuickBooks, allowing for easy reconciliation.
[media-credit id=”1″ align=”alignnone” width=”625″] [/media-credit]
Here’s how you can set up bank feeds:
- From the QuickBooks dashboard, click on “Banking.”
- Select “Add Account” and search for your bank or provide your bank’s URL.
- Enter your bank account credentials and follow the prompts to connect your account.
- Review the transactions imported from your bank and match them with the corresponding entries in QuickBooks.
Creating and Sending Professional Invoices
Creating professional invoices not only helps you get paid faster but also enhances your brand image. QuickBooks offers customizable invoice templates that you can personalize with your logo, colors, and business details.
Follow these steps to create and send invoices:
- From the QuickBooks dashboard, click on “Invoicing” and select “Create Invoice.”
- Enter the customer’s information, including their name, email, and billing address.
- Add line items for the products or services provided, including quantities and prices.
- Customize the invoice layout, add a personalized message, and attach any relevant documents.
- Review the invoice and click “Save and Send” to email it directly to the customer.
Utilizing Keyboard Shortcuts
Keyboard shortcuts can significantly speed up your workflow and navigation within QuickBooks. Memorizing and utilizing these shortcuts can save you time and reduce reliance on the mouse. Here are some useful keyboard shortcuts for QuickBooks:
- Ctrl + I: Create an invoice.
- Ctrl + C: Copy selected text or items.
- Ctrl + V: Paste copied text or items.
- Ctrl + J: Open the Customer Center.
- Ctrl + W: Close the currently active window.
Managing Payroll and Employee Data
For businesses with employees, managing payroll and employee data accurately is crucial. QuickBooks offers robust payroll features that simplify payroll processing. Let’s explore some tips for effectively managing payroll and employee data in QuickBooks.
Setting Up Payroll
To set up payroll in QuickBooks, you need to provide the necessary information about your employees, tax obligations, and payroll preferences. Follow these steps to get started with payroll:
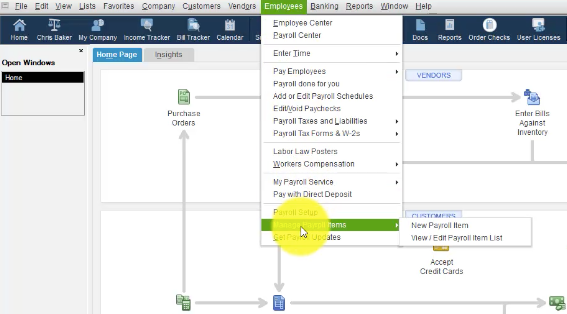
- From the QuickBooks dashboard, click on “Employees” and select “Payroll Setup.”
- Follow the on-screen instructions to enter employee details, including names, addresses, and tax withholding information.
- Configure payroll preferences, such as pay frequency, vacation accruals, and sick leave policies.
- Provide your federal and state tax identification numbers and complete the tax setup process.
Running Payroll
Running payroll in QuickBooks involves calculating employee wages, accounting for taxes and deductions, and generating paychecks. Here’s how you can run payroll efficiently:
- From the QuickBooks dashboard, click on “Employees” and select “Run Payroll.”
- Verify the pay period and select the employees who should be included in the payroll run.
- Enter the hours worked, overtime hours, and any other relevant wage details.
- Review the calculated wages, deductions, and taxes before finalizing the payroll.
- Click “Submit Payroll” to process the paychecks and generate employee pay stubs.
Managing Employee Benefits
QuickBooks allows you to track and manage employee benefits, such as health insurance, retirement plans, and paid time off. Here’s how you can effectively manage employee benefits in QuickBooks:

- From the QuickBooks dashboard, click on “Employees” and select “Employee Center.”
- Select an employee and click on the “Payroll Info” tab.
- Under the “Additions, Deductions, and Company Contributions” section, click on “New Item.”
- Choose the appropriate benefit item, such as health insurance or retirement plan, and enter the corresponding details.
- Click “OK” to save the changes and associate the benefit with the employee.
Maximizing Reporting and Analytics
QuickBooks provides a robust reporting module that allows you to analyze your business’s financial health and make informed decisions. Let’s explore some tips for maximizing reporting and analytics in QuickBooks.
Customizing Financial Reports
[media-credit id=”1″ align=”alignnone” width=”664″] [/media-credit]
QuickBooks offers a wide range of pre-built financial reports, such as profit and loss statements, balance sheets, and cash flow statements. However, customizing these reports according to your specific needs can provide deeper insights into your business. Follow these steps to customize financial reports:
- From the QuickBooks dashboard, click on “Reports” and select “Custom Reports” or choose a specific report category.
- Select the report you want to customize and click “Customize Report.”
- Adjust the report parameters, such as date range, accounts, and columns.
- Customize the report layout, fonts, and headers to match your preferences.
- Save the customized report for future use or memorize it for easy access.
Creating Budgets and Forecasts
Budgeting and forecasting are essential for effective financial planning and decision-making. QuickBooks allows you to create budgets and forecasts based on historical data and projected financials. Here’s how you can create budgets and forecasts in QuickBooks:
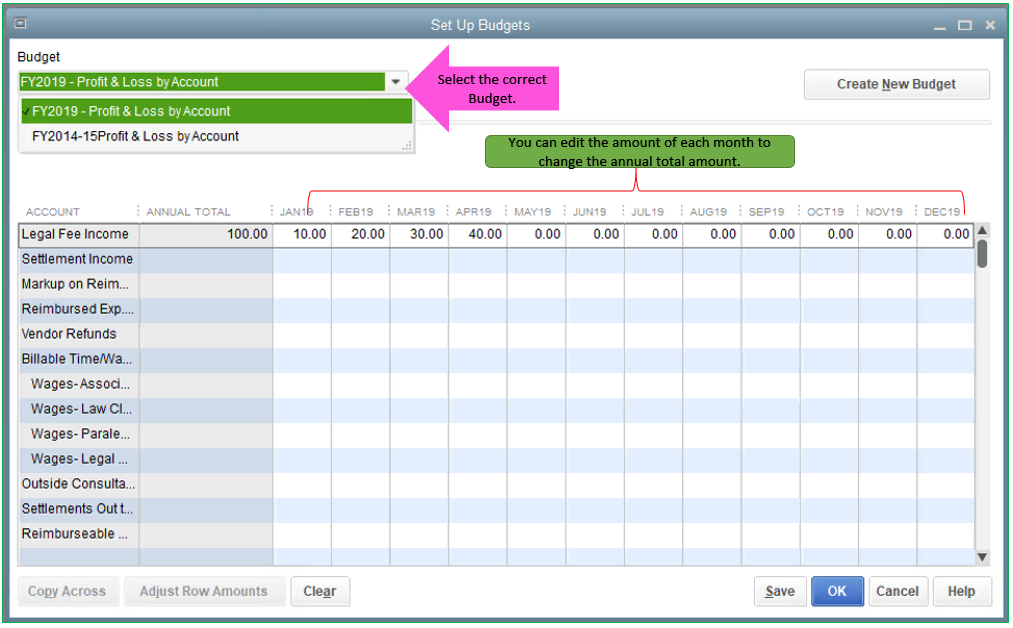
- From the QuickBooks dashboard, click on “Company” and select “Planning & Budgeting.”
- Choose “Set Up Budgets” to create a new budget or “Create Forecast” to generate future projections.
- Specify the budget/forecast period, accounts to include, and the budgeting/forecasting method.
- Enter the budgeted/forecasted amounts for each account and save the budget/forecast.
Analyzing Key Performance Indicators (KPIs)
Monitoring key performance indicators (KPIs) can help you track the health and progress of your business. QuickBooks offers various built-in reports that provide insights into important KPIs. Here are some key reports and the corresponding KPIs they can help you analyze:
Profit and Loss Statement: Analyze revenue, expenses, and net income.
Balance Sheet: Assess your business’s financial position, including assets, liabilities, and equity.
Cash Flow Statement: Track cash inflows and outflows to assess liquidity.
Aging Receivables/Payables: Monitor outstanding customer invoices and vendor bills.
Troubleshooting and Support
Despite its user-friendly interface, QuickBooks can sometimes present challenges or require troubleshooting. Here are some tips to address common issues and find support when needed.
Utilizing Help Resources
QuickBooks provides extensive help resources to assist users in troubleshooting issues and finding answers to their questions. Take advantage of these resources to resolve problems quickly:
QuickBooks Help Center: Access the built-in Help Center within QuickBooks to search for specific topics or browse through articles and tutorials.
Community Forums: Engage with the QuickBooks community forums where users share their experiences, tips, and solutions to common issues.
Intuit Support: Contact Intuit’s support team directly for assistance with technical issues, billing inquiries, or product-related questions.
Regularly Updating QuickBooks
Keeping your QuickBooks software up to date is crucial for accessing the latest features, bug fixes, and security patches. QuickBooks releases regular updates to enhance user experience and address known issues. To update QuickBooks:
- From the QuickBooks dashboard, click on “Help” and select “Update QuickBooks.”
- Click on “Update Now” and wait for QuickBooks to download the latest updates.
- Restart QuickBooks to apply the updates and ensure you are using the most recent version.
Backing Up Your Company File
Regularly backing up your QuickBooks company file is essential to protect your financial data from potential loss or damage.
In the event of hardware failure, data corruption, or other unforeseen circumstances, a recent backup ensures you can restore your data and resume normal operations. Follow these steps to back up your company file:
- From the QuickBooks dashboard, click on “File” and select “Back Up Company.”
- Choose the appropriate backup method: local backup or online backup.
- Select the location or storage device where you want to save the backup file.
- Follow the prompts to complete the backup process, including specifying backup preferences and encryption options.
Frequently Asked Questions (FAQs)
Q1: Can I access QuickBooks remotely?
A1: Yes, QuickBooks offers remote access capabilities through its hosting services or cloud-based versions. By utilizing these options, you can securely access your QuickBooks data from anywhere with an internet connection.
Q2: Can I integrate QuickBooks with other business software?
A2: Absolutely! QuickBooks provides integration capabilities with a wide range of business applications, including customer relationship management (CRM) systems, project management tools, e-commerce platforms, and more. Integrating QuickBooks with other software can streamline data transfer and improve overall efficiency.
Q3: How can I handle multiple currencies in QuickBooks?
A3: QuickBooks supports multi-currency functionality, allowing you to manage transactions and financials in different currencies. To enable multi-currency in QuickBooks, go to the “Edit” menu, select “Preferences,” and choose “Multiple Currencies.” From there, you can set up your preferred currencies and manage exchange rates.
Q4: Can I grant access to multiple users in QuickBooks?
A4: Yes, QuickBooks allows you to add multiple users and grant them different levels of access. You can control user permissions, such as read-only access, full access, or restricted access to specific areas of QuickBooks. Managing user access ensures data security and enables collaborative workflows.
Q5: How can I track inventory in QuickBooks?
A5: QuickBooks offers inventory tracking features that allow you to monitor and manage your product inventory. By setting up inventory items, assigning SKU codes, and tracking quantities, QuickBooks helps you maintain accurate inventory records and streamline the ordering and fulfillment process.
Q6: Is QuickBooks suitable for my small business?
A6: QuickBooks is designed to cater to businesses of all sizes, including small businesses. It offers various versions and plans tailored to different business needs. Whether you have a sole proprietorship, partnership, or small corporation, QuickBooks provides the tools and functionalities to effectively manage your financials.
Read on
Effective Strategies for Revenue Collection
Conclusion
Using QuickBooks effectively is essential for efficient financial management and accurate record-keeping. By implementing the tips and strategies outlined in this guide, you can streamline your accounting processes, optimize reporting and analysis, and make the most out of QuickBooks’s powerful features. Remember to customize QuickBooks to match your business’s specific needs and stay up to date with the latest updates and best practices.
Now that you have learned valuable tips for using QuickBooks effectively, it’s time to put them into action and witness the positive impact on your financial management. Embrace the power of QuickBooks and take control of your business’s finances with confidence!
[wpforms id=”1678″ title=”true” description=”true”]
We have a firm belief that every organization has a unique purpose only they can fulfil in this world. We work with you in organizing your resources to exploit opportunities so that you can fulfil your purpose and realize full potential. We build the capacity of people, processes and systems for organizational success and growth as well as nurturing a thriving ecosystem.
Ready to enhance your skills and boost your career? Explore our corporate training programs now and start your journey to success.


 in Fleet Management")

Comment here